
After learning how to properly reclaim screens, now it's time to dry them. Screen printing expert Colin Huggins shares tips on how to get the best results so your screens are ready to be coated. He also shares how a printer can create an optimal space for drying screens once they have been coated. Take a look!
DRYING RECLAIMED SCREENS
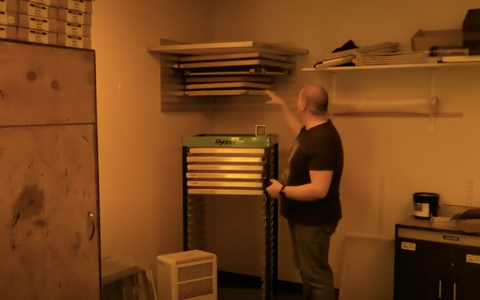
The goal is to drain any leftover water that the screens collected during the reclaim process (while keeping the screens dust- and lint-free). One way to do that is to put the screens on a rack and place a fan behind the rack. You do not want the screens to sit flat because it may allow the water to puddle on the screens. Puddles of water is an issue if you hosed your screens down with hard water. The minerals from the water may adhere to the screen and make it difficult to apply the emulsion to the screen. To avoid the puddling issue, tilt your screen rack. Use a 2x4, stack of cleanup cards, or any materials lying around your shop to help lean the rack forward a smidge.
Insider Tip: Get an HVAC filter to put behind the fan to ensure dust and lint aren't blown onto your screens.
Another way you could dry screens is placing the screen rack on its side so screens are tilted rather than lying flat. Place a fan above the rack to evaporate the water quickly. If you do this method, make sure to have enough space between the rack and the floor so the air can flow through.
Insider Tip: If you have the funds, invest in a dehumidifier. To dry your screens quickly, you need dry air. A dehumidifier will help dry your screens faster and it'll also help dry your screens when they're coated with emulsion.
BUILDING A DRYING CABINET
The more moisture in a screen, the more gummy the emulsion will be. When the emulsion has moisture in it, it becomes more difficult to capture fine details and sharp edges in a stencil. To avoid problems when it's time to expose your screens, printers need to create a dry space with airflow.
WHAT TO DO WITH LITTLE SPACE
If you're working in your garage, spare bedroom, or basement, you can create a dry space in the corner of room. In the video, Colin shows how you can make a shelving unit on the wall by using 2x4s. Once you've made your wall screen rack, you can erect walls, string a plastic curtain, or place plastic zippered tents around it.
Another place for a drying cabinet is a closet. It's dark, enclosed, and removed from everything else in your shop.
If building isn't your thing, you could invest in a Screen Room. The drying cabinet has 10 fans and a built-in temperature control device. It can fit 10 screens.
Once you have encased the area, put a dehumidifier in there. Colin keeps his dehumidifier on 24/7. It'll keep moisture out of the air, helps create airflow, and pushes out warm air. In smaller shops, a dehumidifier is the only source of warm air you'll need. You will also want fans — 20" box fans or standing fans work well. Place the fans where it'll blow directly across the emulsion while picking up the dry, warm air from the dehumidifier. Having this setup will accelerate the drying of the emulsion.
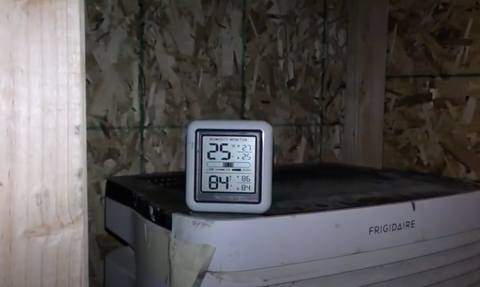
Another handy tool to have is a hygrometer. It's a device that will tell you the humidity level in your room, share the highs and lows of humidity for the past day, and show the temperature. You'll want to keep your moisture levels between 30-40%. The lower you can get it, the better for your screens.

WHAT TO DO WITH MORE ROOM
If you have more space and have carpentry skills, you could build a drying box like Colin did in the video. Made out of wood, plywood, and 2x4s, the DIY drying cabinet is 6.5 ft high and 5 ft wide. The cabinet can fit a screen rack. Inside, there are two box fans setup where they blow air directly over the screens, a dehumidifier, and a hygrometer. The dehumidifier sits at the bottom of an empty chamber. A box fan is above it, blowing air to the top of the cabinet to circle around where the other two box fans blow the warm air onto the screens.
All in all, you want to create a warm, dry, self-contained environment to create the most optimally dried screens as possible. If you have any questions, please don't hesitate to reach out to us.
Stay tuned because next week, we'll discuss the best ways to coat screens! Subscribe to our YouTube channel and turn on notifications so you don't miss it.