Heat transfers are useful for many reasons. You can use transfers for live events, brand shirts with neck labels, and for customers who order in low volume but order consistently over time. Creating a one-color transfer is a simple process. Things get complicated when you add multiple colors. In the video, print expert Colin Huggins walks you through how to create the best multi-color plastisol heat transfers.
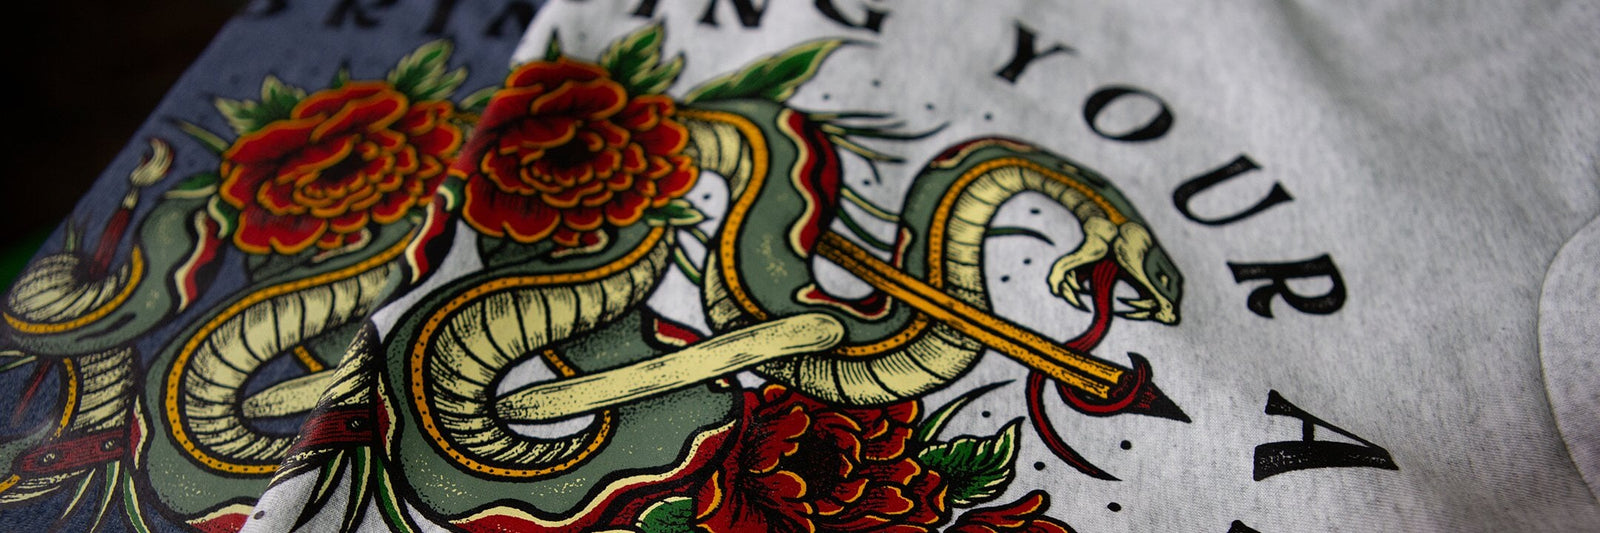
Colin is printing a six-color design with a clear underbase, which equals seven screens. While this design is quite complex, it’s good to know so you’re ready for whatever your customers throw at you.
WHAT YOU’LL NEED
Since printing heat transfers is a different process than printing on t-shirts, you’ll need a few things before heading to production. You’ll need a vacuum platen, a Shop-Vac, transfer paper, a heat press, and transfer adhesion powder.
A vacuum platen keeps the transfer paper in place as you are printing. It also cuts out the need for any adhesive. The vacuum is your glue. You can distort the image and the paper if you have enough adhesive on the platen. This is especially important with multi-color transfers. Since you’re printing more and more colors, you’ll need to apply more and more glue, which can make this problem worse. Platen adhesive can also transfer over to the shirt if you heat press a transfer with adhesive or spray glue on it.
Never used a vacuum platen before? Let’s learn how to use it.
RELATED: HOW TO MAKE PLASTISOL HEAT TRANSFERS
SETTING UP THE VACUUM PLATEN
Set your platen an inch or two away from your print head and attach the vacuum to the bottom of the platen. Tape the shop-vac in place, pull your screen down onto the platen and place your transfer paper where the design falls.
Colin applies a three-point stop for consistent paper placement. Essentially, a three-point stop is what will keep your transfer paper in the same place every time you load. You want a 90° corner to place your paper in. Create it with something that is straight, flat, and durable like two metal rulers. Colin uses aluminum cut to 90° and some tape to keep it in place.
Finally, use excess paper to block off the open vacuum area on the platen. This will keep the suction stable as you print your transfers.

INK GEL TEMP
Another important factor in printing heat transfers is gel temp. You want to make sure all of your inks have the same gel temp. One ink’s gel temp can be another ink’s cure temp. Since you won’t cure the ink until you heat press it onto the shirt, you want to be careful to stay under the ink’s cure temp when you’re gelling the layers.
Colin uses FN-INK™, a plastisol ink that cures at 260℉, so the gel temp will be about 200℉.
To get a consistent gel temp and time, you’ll need the right tools. A conveyor dryer is best for this job. While you can use a flash dryer to gel your ink, flash units and heat guns are usually too inconsistent to create reliable multi-color transfers.
SETTING UP
Once your vacuum platen is in place, it’s time to set up off-contact. The vacuum platen is taller than the other platens Colin has. This means that he will need to change the height of the head clamp.
To do this, loosen up every print head and raise them up as high as they can go. Then, make sure that the side-to-side contact is leveled out and that everything is at the correct height to begin registration. You want enough contact that the screen snaps off the paper as quickly as possible.
SETTING UP REGISTRATION
Before you register, you’ll need to pre-shrink your transfer paper. Run it through the dryer up to three times. You don’t want any residual moisture in the paper. The paper will expand in the presence of moisture and shrink when heated. It is important that the paper is as stable as possible. You want little to no movement or misregistration when you’re printing.
Watch out for any shift in registration if you are in a humid place. If you are, a dehumidifier in your print area could be a good idea. The humidity in Colin’s production area is around 60%. Since he’s printing in a large, open space, a dehumidifier won’t do much good. Battling humidity will be your biggest hurdle while trying to stay in register.
For multi-color transfers, you’ll print in reverse order. Register it in reverse as well so you know everything lines up correctly. Print the front color first, then work your way back to the underbase. When you transfer, the design will be facing the correct way on the shirt.
Colin’s print order is black, red, sage green, dark green, gold, cream, and a clear underbase. Make sure to gel each color after you print it while registering so you can see if any issues arise.
Registration took Colin roughly two hours to get everything perfect. Take your time and do it right so you don’t end up frustrated later on.
RELATED: HOW TO REGISTER ON THE RILEY HOPKINS 250 WITH TILT MICROS
Colin recommends leaving the registration marks visible while you print. You don't need to tape off the registration marks to print the transfers, but you will need to cut the paper to remove them before you press the transfer onto a garment. Keeping the marks helps you see if any registration issues are happening while in production.
Once it’s all registered, do a final test print to make sure the elements of your design are all aligned. Colin also recommends doing a transfer test to make sure the design looks correct on the shirt before heading into production.

PRINTING
When printing any heat transfers, it’s important that you don’t push or pull too hard. Because you’re printing on a surface that does not absorb any ink, too much pressure will smash the ink and ruin the crisp edges of your design.
Pro Tip: If you’re having trouble with maintaining crisp edges when printing your transfers, make sure to use a sharp squeegee and keep your angle closer to 90°.
Colin recommends a single print stroke, but you may have to do two print passes for translucent inks or when using higher mesh counts. You can also print, gel, and print that same ink again for better color development.

GELLING THE INK
Gelling the ink is an important step in printing multi-color heat transfers. FN-INK™ cures at 260℉, so Colin sets the dryer to heat the ink to about 180°-200℉. He resets the dryer temp and belt speed to hit this temperature.
But why should you gel ink instead of curing it? The ink needs to be able to cure and bond with the t-shirt during the transfer process, not while printing. If you were to cure one or more of your inks while printing, the print could fall apart in the wash. By gelling the ink, the transfer becomes more durable, maintaining its form until it’s time to heat press it.
Print one layer, gel it, and then print the next color. The last color you print will be the underbase. This will cover your entire design and will hold all the adhesion powder. Colin uses a clear underbase that covers the entire design. If you have a print with an underbase that covers the entire design, that works great too.
Don’t gel the underbase once you print it. It needs to be wet for the next step of the process.
RELATED: SUPPLY AND EQUIPMENT UPGRADES THAT IMPROVE PRODUCTION AND QUALITY OF PRODUCT

APPLYING ADHESION POWDER
To apply transfer adhesion powder, get a bin or something wide to keep the powder contained. Sprinkle the powder on the transfer and make sure the powder coats the entire ink layer. Tap or flick the paper to release extra powder.
Once your transfer has been coated in powder, put it through the dryer to gel for the last time.
Your transfers are now ready to be pressed onto the shirt. Colin heads over to the heat press to finish the job.

HEAT PRESSING THE TRANSFERS
Heat pressing is pretty simple. For this job, Colin sets the heat press to 350℉ and uses medium pressure.
Load a shirt onto the heat press. Preheat the garment for about five seconds to smooth it out and get rid of any moisture.
Place the transfer on top of the shirt where you want it to be. To properly align your transfer to the garment, you can cut out your design and/or cut a notch in the center of the transfer paper so you can get it in the perfect position.
Pull the heat press down and wait for 7-10 seconds. Since Colin is using hot peel paper, he pulls the paper off within 3-5 seconds of transferring. It’s that easy. As always, test for what works best for you.
RELATED: THE HEAT PRESS, EVERY PRINTER’S SECRET TOOL

Now you can store a bunch of transfers for a client and just heat press them on a shirt when they need them. It's quick, reliable, and a great way to make more money. With a little planning and precision, you’ll be creating multi-color heat transfers like a pro in no time.